Introduction: Why Composition is the Key to Better Photography
Composition is one of the most important elements in photography. While lighting, subject choice, and editing play crucial roles, composition is what makes an image visually engaging and memorable. A well-composed photo has a natural flow, guides the viewer’s eye, and creates a strong emotional impact.
Understanding composition is what separates an amateur snapshot from a professional photograph. Luckily, you don’t need expensive equipment to master composition—by applying a few simple techniques, you can dramatically improve your photography.
This guide will cover five essential composition tricks that will help you take stunning images. Whether you shoot with a DSLR, mirrorless camera, or smartphone, these techniques will elevate your work to a professional level.
1. Rule of Thirds: The Foundation of Great Composition
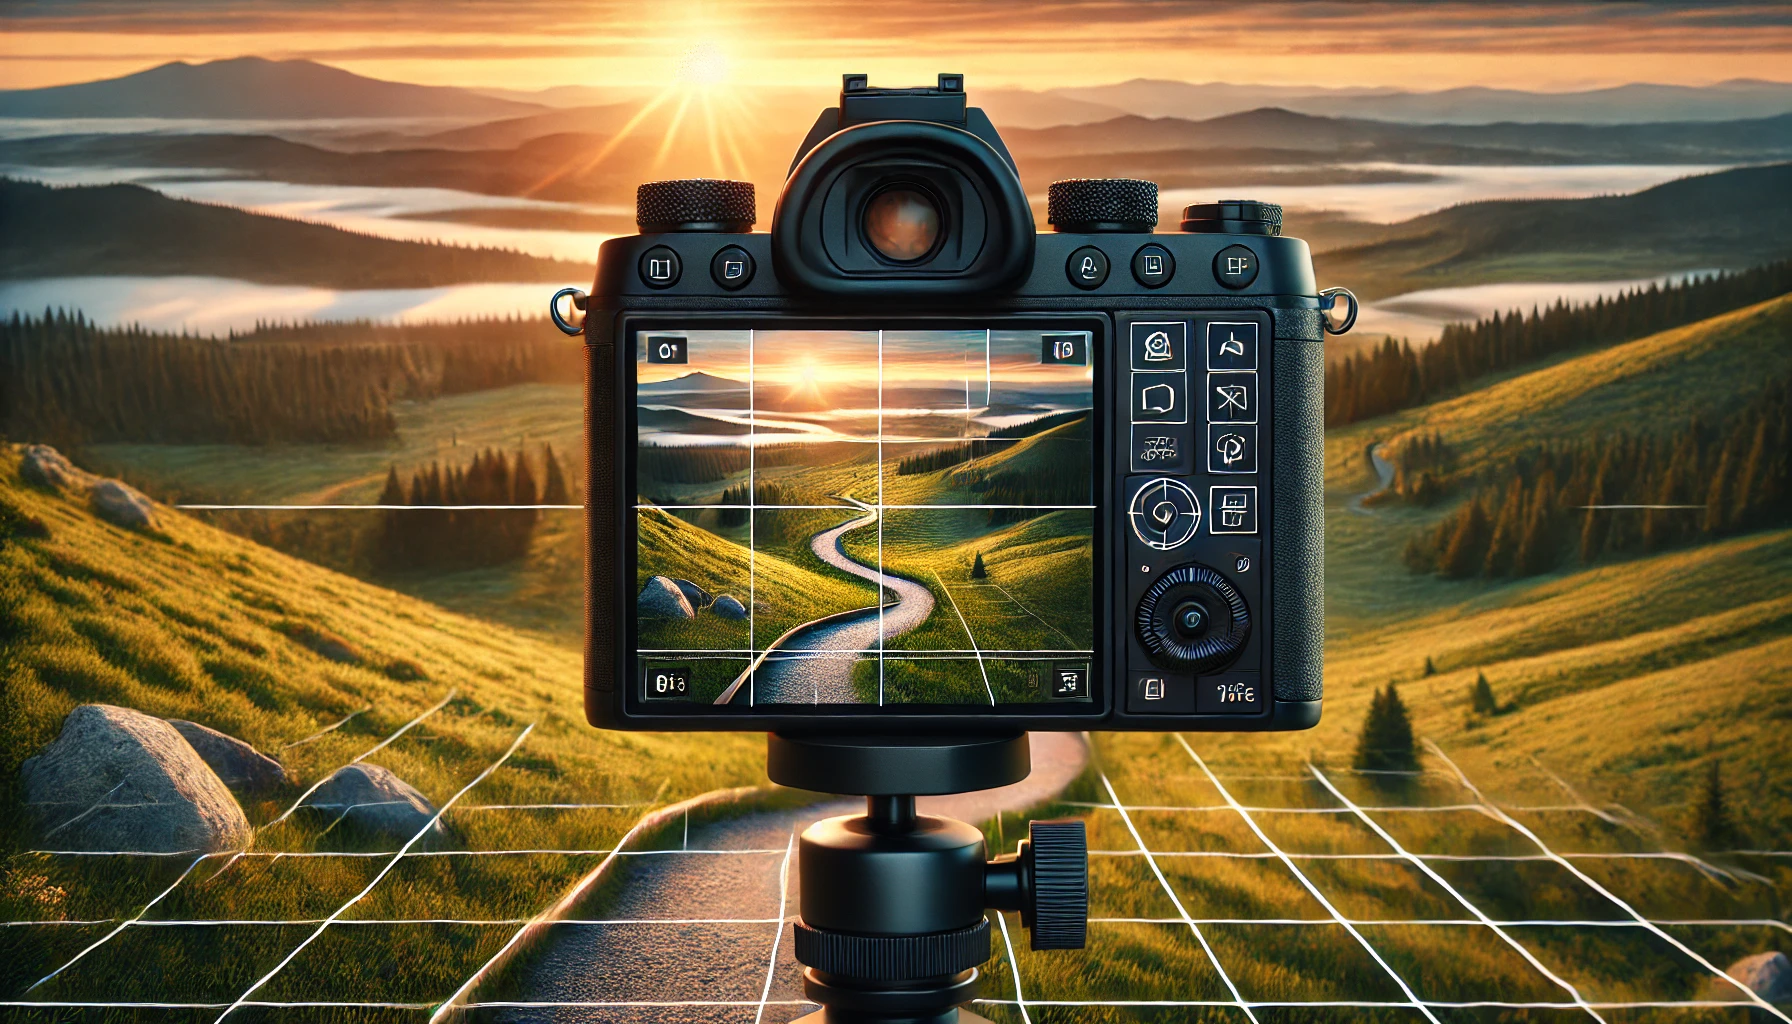
The Rule of Thirds is one of the most widely used composition techniques in photography. It involves dividing your image into a 3×3 grid with two horizontal and two vertical lines. The idea is to position key elements of your photo along these lines or at their intersections, rather than placing the subject in the center.
Why the Rule of Thirds Works
- It creates a natural sense of balance and visual interest.
- It helps the viewer’s eye move naturally across the image.
- It avoids a static or overly symmetrical composition.
How to Use the Rule of Thirds in Photography
- Turn on the Grid Feature – Most cameras and smartphones have a built-in grid overlay to help you align your subjects.
- Position Key Subjects Along the Grid Lines – Instead of centering your subject, place it on the left or right third of the frame.
- Align Horizons Properly – If shooting landscapes, keep the horizon along the top or bottom third rather than splitting the image in half.
Examples of the Rule of Thirds in Action
- Portraits: Instead of placing a person’s face in the center, align their eyes along the top horizontal third.
- Landscapes: Position the horizon on either the top or bottom third of the frame for a more dynamic look.
- Street Photography: Place a subject (such as a person walking) on one of the vertical lines to create movement and depth.
While the Rule of Thirds is a great guideline, don’t be afraid to break it occasionally if it helps tell a stronger story.
2. Leading Lines: Guide the Viewer’s Eye to the Subject
Leading lines are natural or man-made lines that direct the viewer’s attention toward a focal point in the image. These lines create a sense of movement, depth, and perspective, making your photos more engaging.
Types of Leading Lines to Look For
- Roads & Pathways – Streets, sidewalks, and trails naturally lead the eye into the frame.
- Railway Tracks – Train tracks create strong, symmetrical leading lines.
- Fences & Bridges – These structures naturally frame subjects.
- Rivers & Shorelines – Waterways help create depth in landscapes.
- Architectural Elements – Buildings, hallways, and staircases provide powerful lines.
How to Use Leading Lines Effectively
- Find Natural Lines in Your Environment – Pay attention to roads, fences, rivers, or even shadows.
- Position Your Subject at the End of the Line – This helps draw attention to the subject.
- Experiment with Perspective – Shooting from a low angle can make leading lines more dramatic.
- Use Curved Lines for a Softer Look – While straight lines create structure, curved lines add a sense of flow and elegance.
Examples of Leading Lines in Photography
- A road leading to a mountain peak draws the eye toward the main subject.
- A pier extending into the ocean creates depth and guides the viewer to the horizon.
- Railway tracks converging in the distance add a dramatic effect to urban photography.
Mastering leading lines can make your photos feel more immersive and intentional.
3. Framing: Create a Natural Frame Around Your Subject
Framing is a technique that uses objects in the foreground to naturally enclose the subject. This creates depth, context, and visual interest. Instead of taking a straightforward shot, framing helps draw attention to the subject in a creative way.
Types of Natural Frames to Use
- Windows & Doorways – Use architectural elements to frame a person or scene.
- Tree Branches & Foliage – Nature can create beautiful, organic frames.
- Archways & Bridges – Common in urban photography, adding depth.
- Hands or Silhouettes – Positioning people in a way that they frame another subject.
How to Apply Framing in Your Photography
- Look for Objects to Frame Your Subject – Move around and find creative ways to enclose your subject.
- Keep the Frame in the Foreground – This makes the subject stand out while adding a three-dimensional feel.
- Experiment with Focus – Try blurring the foreground to create a soft, dreamy effect while keeping the subject sharp.
Examples of Framing in Photography
- A couple framed by a window in a café, adding a sense of intimacy.
- A child playing, seen through a gap in a wooden fence, creating curiosity.
- A portrait framed by tree branches, adding texture and depth.
Framing can make even simple subjects appear more thoughtful and visually compelling.
4. Negative Space: Keep It Simple for Stronger Impact
Negative space refers to the empty areas around the subject in an image. When used effectively, negative space makes your subject stand out, adds minimalist elegance, and creates a feeling of calmness or isolation.
Why Negative Space Works
- It creates a sense of simplicity and focus.
- It emphasizes the subject without distractions.
- It conveys emotion and storytelling (loneliness, vastness, or serenity).
How to Use Negative Space in Your Photos
- Find a Clean, Uncluttered Background – Use plain walls, open landscapes, or large skies.
- Position the Subject Off-Center – This allows the negative space to become part of the story.
- Use Color Contrast – A bold color contrast between the subject and background enhances visual impact.
Examples of Negative Space in Photography
- A single boat floating on a vast ocean creates a sense of solitude.
- A portrait with a blurred, empty background directs all focus to the person’s expression.
- A bird flying in a wide sky conveys freedom and motion.
Negative space proves that sometimes, less is more in photography.
5. Symmetry & Reflections: Create Balanced and Striking Images
Symmetry is naturally pleasing to the eye and creates a strong sense of balance and harmony. It works especially well in architecture, nature, and reflections.
How to Use Symmetry in Photography
- Look for mirrored reflections in water, glass, or smooth surfaces.
- Capture perfectly aligned architectural elements like bridges, doorways, and staircases.
- Center the subject precisely in the frame to achieve a balanced composition.
Examples of Symmetry in Photography
- A city skyline reflected in a lake creates a mesmerizing, mirror-like effect.
- A perfectly centered staircase draws the viewer’s eye into the frame.
- A face split between shadow and light adds drama and contrast.
Conclusion: Master Composition to Transform Your Photography
Composition is the foundation of powerful photography. By using the Rule of Thirds, Leading Lines, Framing, Negative Space, and Symmetry, you can take more professional, engaging, and visually stunning images.
These techniques will help you develop your unique photographic style and elevate your skills. Keep experimenting, practice often, and soon, composition will become second nature in your photography.