The Rise of Drone Photography and the Importance of Editing in Service Value
In recent years, aerial photography with drones has established itself as one of the biggest trends in the Brazilian visual market. From real estate to weddings, natural landscapes to industrial inspections, drones have become essential tools for capturing images with scale, impact, and a unique perspective. But taking good shots from above is just the first step. Knowing how to edit photos taken with drones is what truly defines the professional level of the final product.
Photo editing acts as both a technical and artistic enhancement. It corrects imperfections, highlights details, balances colors and lighting, and—most importantly—gives the image identity. Photos that undergo a proper post-production process have greater visual appeal, convey professionalism, and stand out amid the flood of content on social media, portfolios, and listings. In this context, editing becomes a competitive edge that can justify higher pricing for drone services.
This added value is also reflected when negotiating with clients. Many professionals ask: what is the daily rate for a drone? The answer varies, but one of the key factors is the quality of the final delivery. A well-executed flight has its value, but when it’s paired with expertly edited images, the service becomes more complete—and naturally more valuable. It’s the difference between simply “delivering a photo” and “delivering a visual experience.”
Therefore, mastering how to edit photos taken with drones is an essential skill for anyone looking to stand out in this field. In this article, we’ll explore the best tools, techniques, and strategies to transform aerial shots into high-impact images—adding value to both the project and the professional behind the lens and controls.
Why Is Editing So Important in Drone Photography?
Post-Production as a Quality Differentiator and Service Value Booster
Aerial photography naturally offers an impressive perspective, but it’s through editing that the image truly comes to life. Many don’t realize that even with a high-quality drone, raw photos often come out with unbalanced lighting, washed-out colors, or lack of contrast. Through editing, you can perform essential adjustments to exposure, sharpness, saturation, and white balance, as well as correct lens distortion—turning a good shot into something visually striking.
With strong post-production skills, photographers can highlight points of interest, remove distractions, and guide the viewer’s eye to what really matters in the composition. This allows even simple captures made with entry-level drones to approach the visual quality of professional gear. In addition, applying a consistent visual style builds brand identity and helps distinguish a photographer’s portfolio in an increasingly saturated market.
Another key point is that editing directly adds value to the service. When clients see that the images they receive are carefully treated, polished, and finished with attention to detail, their perception of professionalism and premium service increases. This is directly tied to pricing: when assessing what is the daily rate for a drone, it’s important to factor in not just the flight time, but also the hours spent on post-production—a detail often overlooked by beginners in the field.
So, editing isn’t just an aesthetic extra—it’s a critical stage in drone photography. Those who master editing tools can elevate their work, justify higher fees, and earn the trust of demanding clients. After all, knowing how to take photos with a drone is just the beginning—editing is what turns a shot into art and perceived value.
Most Commonly Used Software for Editing Drone Photos
Tools That Transform Aerial Captures into Professional Images
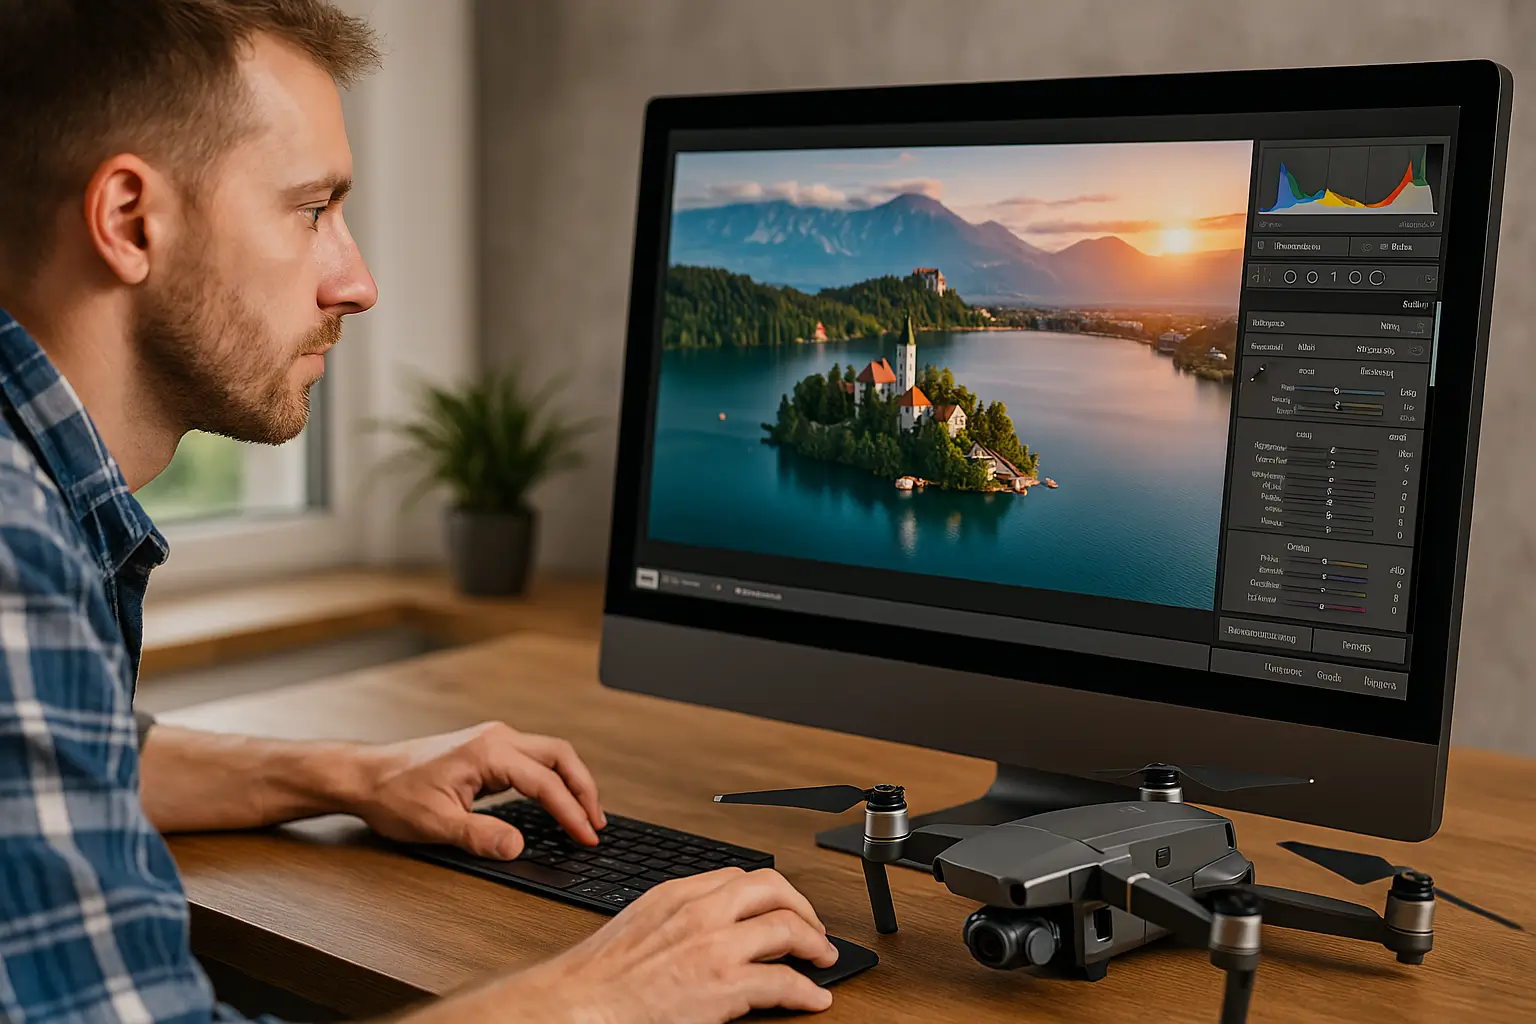
Once you’ve mastered how to take photos with a drone, the next essential step is to invest in editing software capable of extracting the full potential from your captured images. These programs offer specific tools to adjust color, lighting, contrast, perspective, and sharpness—all critical for aerial photography to reach its visual peak. With advancing technology, there are options for both professionals and beginners, including desktop and mobile versions that meet varying levels of expertise.
Among the market leaders, Adobe Lightroom stands out as the top choice for photographers. With an intuitive interface and powerful controls for exposure, tonality, and lens correction, it’s perfect for editing RAW files while preserving the high quality captured by your drone. Adobe Photoshop, on the other hand, goes beyond adjustments and enables more complex edits, such as object removal, masking, and creative compositions—ideal for those looking to deliver standout visual services.
For those seeking a premium alternative to Adobe’s ecosystem, Capture One is an excellent choice. Widely used by fashion, landscape, and architectural photographers, it offers superior color fidelity, advanced layer control, and a robust workflow, making it ideal for professional projects with a high image volume. Its tethering capabilities and session-based organization also improve productivity for those working with demanding clients.
There are also free and mobile-friendly options that work well for beginners. Snapseed, by Google, includes powerful tools like selective adjustments, curves, and filters with surprisingly high quality for a free app. Lightroom Mobile replicates much of the desktop version and allows for quick edits with cloud syncing—perfect for delivering visual content on the go. These alternatives are great for newcomers to the drone market who want to reduce initial costs while maintaining strong image quality.
How to Organize Your Files and Workflow
Efficiency and Security to Edit Drone Photos with More Speed and Professionalism
Mastering how to take photos with a drone is only one part of the process—organizing your files and post-production workflow is what ensures productivity, consistency, and data safety. Without a well-defined structure, it’s easy to waste time searching for images, repeating unnecessary edits, or even losing important files. That’s why having a clear system for file naming, backup, and categorization is essential for anyone working professionally with aerial photography.
Start with renaming your files. Avoid default names like “DJI_0001” and use a personalized format, such as: client_location_date_version.jpg. This practice makes it easier to search, share, and organize on cloud services or external hard drives. Also, maintain a standardized folder structure, such as:
/Projects
 └── Client_X
     ├── RAW
     ├── Edited
     ├── Previews
     └── Final_Exports
Another crucial point is to separate files by project, client, or image type. Event photos require different treatment than inspection or real estate images, and this distinction helps not only during editing but also when building portfolios or delivering content to clients. Tools like Adobe Bridge, Lightroom, or even cloud platforms like Google Drive and Dropbox with tagging features can help maintain effective and synchronized control.
Finally, optimizing post-production time comes with habit and workflow refinement. Automate steps with presets, use virtual copies to test different versions, and create a checklist for each project type. The more organized your process, the more value you deliver per hour of work. So when someone asks what is the daily rate for a drone, you’ll have both technical and logistical reasoning to back your price: efficiency, security, and professional delivery in every detail.
Basic Editing: Essential Steps
Fundamental Corrections to Enhance Aerial Photos from the Start
Before diving into advanced edits, it’s essential to master the basic adjustments that ensure balance and natural aesthetics in drone photography. This initial stage forms the foundation for any visual style-whether realistic, artistic, or commercial. Proper use of core editing tools allows your image to reach its full potential, even when shot under challenging lighting or environmental conditions.
The first step is adjusting exposure, which corrects images that are too dark or blown out. Next, calibrate the white balance to ensure that the image’s color tones reflect the actual lighting conditions of the moment. Manipulating shadows and highlights helps recover details from overly dark or bright areas-something common in aerial photos with strong sunlight or high contrast between sky and ground.
Another critical point is the correction of distortions, especially in images taken with wide-angle drone lenses. Fixing tilted horizons and exaggerated perspectives adds professionalism to the composition and prevents the photo from looking amateurish. Most editing software now includes automatic lens corrections and horizon alignment tools, which make this process easier-even for beginners.
Finally, applying sharpening and noise reduction in moderation ensures a clean and pleasant finish. Overdoing sharpness can create unwanted artifacts, while excessive noise reduction may blur out essential details. Balancing these tools results in images that stand out for their quality and natural look-something crucial for adding value to your service and justifying the daily rate of a professional drone.
Advanced Editing: Adding Style to Your Images
Creative Techniques to Transform Aerial Photos into Unique and Memorable Compositions
After mastering the basics, the next step for anyone looking to stand out in aerial photography is to explore advanced editing techniques that bring personality and visual consistency to their work. The aesthetic of an image has a direct impact on how it’s perceived by both the audience and clients, making editing a strategic tool for photographers who want to justify the daily rate of a drone and attract higher-end projects.
One of the most practical ways to develop a personal style is through the application of LUTs (Look-Up Tables) and custom presets. These preconfigured settings can be applied with a single click and provide harmonized colors, contrast, and tones, helping to create a cohesive visual identity across a series of photos. While LUTs are commonly used in video editing, they also work well with photo RAW files in software like Lightroom, Photoshop, and DaVinci Resolve.
For even more professional results, it’s worth investing in color grading specific areas of the image, such as the sky, vegetation, buildings, or skin tones (in the case of events). Using tools like HSL (Hue, Saturation, Luminance), tone curves, and channel adjustments, you can create cinematic or natural color tones, depending on your intended style. This approach is especially effective in landscape, cityscape, and wedding photography, where emotional atmosphere directly influences the image’s impact.
Another powerful resource in advanced editing involves layers, masks, and selective adjustments. These tools allow you to apply effects to specific areas without altering the entire image. For example, you can darken the sky, increase sharpness on a building, or highlight a road by boosting saturation. Mastering these techniques separates amateurs from professionals and enables you to deliver highly tailored results to each client – offering not just a beautiful image, but an artistic, signature photo with high added value.
Common Mistakes in Drone Photo Editing
Avoid Overediting That Harms the Quality and Credibility of Your Aerial Images
When learning how to take photos with a drone, many beginner photographers get excited during the editing phase and end up making mistakes that compromise the final image quality. Excessive effects, forced adjustments, and heavy-handed visual interventions can turn a promising photo into something visually overwhelming or unrealistic. The pursuit of impact often results in a loss of naturalness, reducing the professional appeal of the final delivery.
One of the most frequent mistakes is the use of excessive saturation, which makes skies unnaturally blue, trees neon green, and scene elements overly vibrant. While the intention may be to make the image stand out, the result often looks exaggerated and may alienate the viewer. Another issue is applying artificial sharpness, which creates harsh edges, noise, and unpleasant textures—especially when working with lower-quality original files.
Unrealistic colors are another common problem, typically caused by poorly applied LUTs or filters. A sunset that turns fluorescent purple or green landscapes that become bluish might look “stylish” at first, but rarely hold up in professional portfolios or with demanding clients. The credibility of an image is tied to the authenticity of the captured scene – which is particularly important in niches like tourism, real estate, and event photography.
To maintain balance, a few simple tips can make a big difference:
- Apply adjustments gradually, evaluating the image as a whole.
- Always compare with the original photo to keep natural light and color in check.
- Use presets cautiously and customize them to fit the context of each image.
- Seek feedback from other professionals to sharpen your critical eye.
In short, editing should enhance the essence of the image, not completely reinvent it. Delivering realistic, coherent, and technically refined visuals builds client trust and helps reinforce the value behind the daily rate of a professional drone operator who includes quality post-production.
Exporting Properly: File Formats and Final Quality
Optimized Deliverables for Every Use-Without Losing Quality or Performance
After carefully editing your work, it’s essential to know how to properly export photos taken with a drone to ensure they maintain high quality and meet the intended purpose-whether for printing, social media, a digital portfolio, or email delivery. Many professionals overlook this final step, but the way your final file is generated directly impacts sharpness, load times, and even how your client perceives the work.
There are three primary formats used in photo exports: JPEG, TIFF, and RAW. JPEG is lightweight and widely accepted, making it ideal for quick sharing on social media and email. However, it uses compression and loses quality each time it’s saved. TIFF, on the other hand, preserves maximum quality with no visible compression and is perfect for high-resolution prints or professional archiving. RAW is not typically used for delivery-it’s the unprocessed camera file best reserved for editing or future revisions. Never send RAW files to a client as a final product.
Export resolution should also be adapted to the platform. For social media, 2048 pixels on the long edge is enough for Facebook and Instagram. For online portfolios, images between 2500 and 3000 pixels balance quality and load speed. For printing, aim for 300 DPI (dots per inch) and export at the camera’s native resolution for maximum clarity. Whenever possible, save tailored versions for each use case to avoid unnecessary reprocessing.
Lastly, consider web and digital optimization. Tools like Lightroom, Photoshop, TinyPNG, and Squoosh help reduce file size without visibly sacrificing quality. This is crucial for faster website loading, PDF presentations, and email attachments with size limits. Strategically exporting your drone photos adds extra value to your work, demonstrating attention to detail in every phase of delivery. And this level of care directly influences how much the daily rate of a drone operator with professional post-production is worth.
How Good Editing Increases the Value of Drone Services
Well-Edited Images Enhance Perceived Value and Justify Higher Prices
In the aerial photography market – where competition grows by the day—the quality of the final delivery has become a decisive factor for success. Good editing transforms an ordinary image into a visually striking piece, capable of impressing clients and boosting perceived professionalism. This transformation isn’t just aesthetic – it directly impacts how the work is evaluated, recommended, and most importantly, compensated.
When people think of drones, they often focus only on the flight or the equipment. However, those who truly stand out are professionals who know how to take photos with a drone and edit them with excellence. More impactful deliveries lead to stronger portfolios, greater engagement on social media, and consequently, more business opportunities. A well-edited image communicates care, technical mastery, and attention to detail – all traits highly valued by demanding clients.
In this context, editing becomes an essential competitive differentiator. Many drone photographers deliver only raw files or apply basic adjustments. Those who go further – applying precise corrections, professional color grading, and optimized exports – position themselves as specialists, not just “drone pilots.” This professional positioning directly influences service pricing and provides clear justification for charging more.
The question “what is the daily rate for a drone?” doesn’t have a fixed answer, because it also depends on the quality of the final product. A professional who includes high-level editing adds value to their service and can rightly charge more. Clients aren’t just paying for flight time – they’re investing in the complete, polished visual result. In this landscape, editing skills make all the difference in turning an ordinary job into a premium-level delivery.
How Much to Charge: Daily Rates, Packages, and Editing
How to Structure Fair Pricing That Reflects Flight Time and Professional Editing
One of the most common questions among drone photographers and operators is: “What is the daily rate for a drone?” The answer depends on various factors – and photo editing is one of the most important. Many professionals underestimate the time spent on post-production, which leads to underpricing and undervaluing their own work. That’s why accurate pricing must consider flight time, travel, preparation, editing, and delivery.
When building your pricing model, break down the costs by service stage. For example:
- Flight and image capture: $120
- Basic editing (exposure, color, sharpness): $50
- Advanced editing (custom presets, color grading, multi-format export): $80
- Organized delivery via cloud with optimized versions: $20
A full-service package can range from $150 to $300 per day, depending on the level of editing included. Packages without editing – where the client receives only raw files – tend to be cheaper, but also less valued. Additionally, they don’t convey the same level of professionalism or visual refinement.
Market trends show that clients are increasingly seeking complete solutions, from capture to final editing. That’s why including post-production in your main package not only adds value to your service, but also allows you to charge more fairly. The client’s perception shifts when they understand they’re not just hiring someone to fly a drone, but a full visual experience that requires skill, time, and artistic sensitivity.
Conclusion
Editing with excellence is what turns images into perceived value for the client
Throughout this content, it has become clear that knowing how to take photos with a drone is just the first step for anyone who wants to work professionally in this growing market. Photo editing is not an optional detail but a strategic phase that determines visual impact, photographer identity, and the perceived quality of the service. It’s through editing that images come to life, gain personality, and stand out in a competitive landscape.
More than mastering tools, it’s essential to develop a sharp technical eye—one that can identify what needs correcting, adjusting, or enhancing in each aerial scene. This skill is built through consistent practice, studying references, and exchanging experiences with other professionals. Each new edit becomes an opportunity to grow artistically and add more value to the final delivery.
For those aiming to stand out, editing well is also a positioning tool. Visually cohesive work with a clear identity and professional finishing builds trust, generates referrals, and allows you to charge more for your services. In a market where many still deliver raw files or use generic filters, professionals who dedicate time and care to post-production quickly set themselves apart.
So if you’re asking yourself what is the daily rate for a drone, the answer goes beyond flight time. It lies in the quality of the final product, the attention given to editing, and the value perceived by the client. Editing well is more than adjusting light and color—it’s about turning each image into a memorable visual experience, elevating both the standard of your work and your financial return.